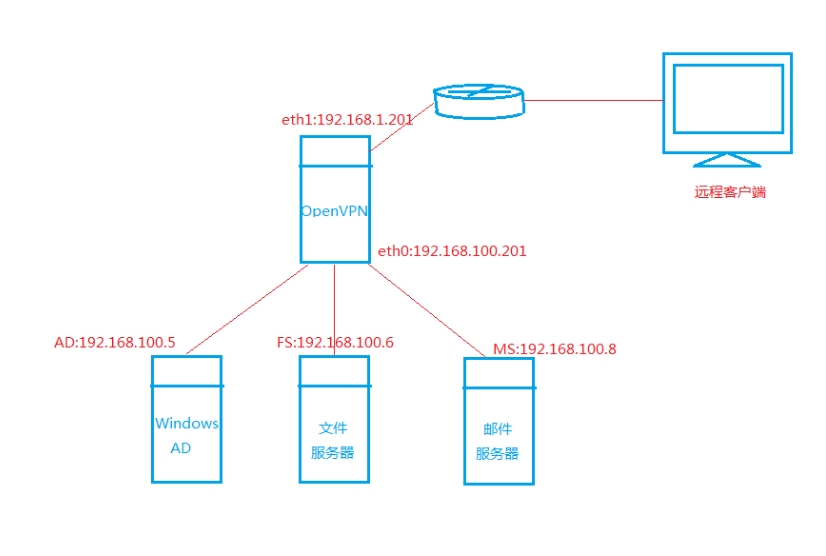
yango公司现在在弄各种的VPN 这里是我自己研究的一种,后期会分享很多给大家。 有otp做VPN ,有公司内网VPN 加密。 后期整理出来,爱运维一起学。
yango的运维派可以扣扣群加:459096184 运维派大家一起讨论。
有什么不懂的,有什么不太明白的,直接给我留言或者加入扣扣群问我,都会帮你解决。
学习中
工具百度云里面 http://pan.baidu.com/s/1bnnnj1H
这里我已经有将openvpn软件进行打包(包含了openvpn-2.3.3.tar.gz服务器安装包 openvpn 32/64位客户端 lzo-2.0.6.tar.gz依赖包 easy-rsa证书制作工具)
1.时间校对
开始没有对时,导致后来无法联入VPN
|
1
2
3
4
|
yum -y installunzip pam-devel ntpdate openssl openssl-devel#unzip用于解压软件#pam-devel是安装openvpn必要的依赖包#ntpdate是网络校时工具 |
|
1
2
3
|
ntpdate time.nist.gov 同步时间echo"/usr/sbin/ntpdate time.nist.gov">> /etc/rc.localecho"* */2 * * * /usr/sbin/ntpdate time.nist.gov">> /etc/crontab |
2.lzo的安装
|
1
2
3
4
5
6
7
8
|
unzip openvpn-2.3.3.zipcdopenvpn-2.3.3
tarzxvf lzo-2.06.tar.gz
cdlzo-2.06
./configure--prefix=/usr
make&& makeinstall
/sbin/ldconfigcd..
|
3.openvpn的安装
|
1
2
3
4
5
6
7
8
9
10
11
12
13
|
mkdir-p /data/openvpn/conf#用于存放配置文件mkdir-p /data/openvpn/log#用于存放openvpn日志mkdir-p /data/openvpn/easy-rsa
#用于存放密钥生成工具及密钥tarzxvf openvpn-2.3.3.tar.gz
cdopenvpn-2.3.3
./configure--prefix=/data/openvpn
make&& makeinstall
cpsample/sample-config-files/server.conf /data/openvpn/conf/
#拷贝实例配置文件cd..
|
4.easy-rsa的解压
|
1
2
3
4
5
|
unzip easy-rsa.zipcdeasy-rsa/2.0/
cp-rf * /data/openvpn/easy-rsa/
cd/data/openvpn/easy-rsa/
chmod+x *
|
5.修改vars文件
|
1
2
3
4
5
6
7
8
9
10
11
|
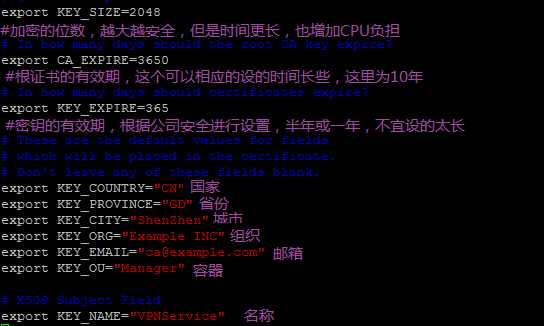
vim varsexportKEY_SIZE=2048
exportCA_EXPIRE=3650
exportKEY_EXPIRE=365
exportKEY_COUNTRY="CN"
exportKEY_PROVINCE="GD"
exportKEY_CITY="ShenZhen" 城市随便填一个即可
exportKEY_ORG="Example INC" 组织单位
exportKEY_EMAIL="ca@example.com" 邮箱地址可以随便填写
exportKEY_OU="Manager" 组织容器可以随便填写
exportKEY_NAME="VPNService" 名称可以随便填写
|
|
1
2
|
sourcevars
#使之生效 |
6.生成证书
|
1
2
3
4
5
6
7
8
9
10
11
12
13
14
15
16
17
18
19
20
21
22
23
24
|
./clean-all
#初始化./build-ca
#创建根证书,一路回车即可Generating a 2048 bit RSA private key........+++.+++writing new private key to 'ca.key'
-----You are about to be asked to enter information that will be incorporatedinto your certificate request.What you are about to enter is what is called a Distinguished Name or a DN.There are quite a few fields but you can leave some blankFor some fields there will be a default value,If you enter '.', the field will be left blank.
-----Country Name (2 letter code) [CN]:State or Province Name (full name) [GD]:Locality Name (eg, city) [ShenZhen]:Organization Name (eg, company) [Example INC]:Organizational Unit Name (eg, section) [Manager]:Common Name (eg, your name or your server's hostname) [Example INC CA]:
Name [VPNService]:Email Address [ca@example.com]: |
创建服务器端密钥
|
1
2
3
4
5
6
7
8
9
10
11
12
13
14
15
16
17
18
19
20
21
22
23
24
25
26
27
28
29
30
|
./build-key-serverserver
Country Name (2 letter code) [CN]: #回车
State or Province Name (full name) [GD]: #回车
Locality Name (eg, city) [ShenZhen]: #回车
Organization Name (eg, company) [Example INC]: #回车
Organizational Unit Name (eg, section) [Manager]: #回车
Common Name (eg, your name or your server's hostname) [server]: #回车
Name [VPNService]: #回车
Email Address [ca@example.com]: #回车
Please enter the following 'extra'attributes
to be sent with your certificate requestA challenge password []: #回车
An optional company name []: #回车
Using configuration from /data/openvpn/easy-rsa/openssl-1.0.0.cnf
Check that the request matches the signatureSignature okThe Subject's Distinguished Name is as followscountryName :PRINTABLE:'CN'
stateOrProvinceName :PRINTABLE:'GD'
localityName :PRINTABLE:'ShenZhen'
organizationName :PRINTABLE:'Example INC'
organizationalUnitName:PRINTABLE:'Manager'
commonName :PRINTABLE:'server'
name :PRINTABLE:'VPNService'
emailAddress :IA5STRING:'ca@example.com'
Certificate is to be certified untilMay 5 02:35:08 2015 GMT (365 days)
Sign the certificate? [y/n]:y #输入y,回车
1 out of 1 certificate requests certified, commit? [y/n]y #输入y,回车
Write out database with 1 new entriesData Base Updated |
创建用户
|
1
2
3
|
./build-keyclient
#创建client用户#方法和创建服务器密钥是一样的 |
创建Diffie-Hellman文件
|
1
|
./build-dh
|
7.配置openvpn
|
1
2
3
4
5
6
7
8
9
10
11
12
13
14
15
16
17
18
19
20
21
22
23
24
25
26
27
28
29
30
31
32
33
34
35
36
37
38
39
40
41
42
43
44
45
46
47
48
49
50
51
52
53
54
55
56
|
#本机要侦听使用的IP地址local192.168.1.201
#使用的端口,默认1194port 1194#使用的协议,默认使用UDP,如果使用HTTP proxy,必须使用TCP协议proto udp#使用的设备可选tap和tun,tap是二层设备,支持链路层协议。#tun是ip层的点对点协议,限制稍微多一些,建议使用tun,如果使用桥接的话,就必须要使用tapdev tun#OpenVPN使用的ROOT CA,使用build-ca生成的,用于验证客户是证书是否合法ca /data/openvpn/easy-rsa/keys/ca.crt
#Server使用的证书文件cert /data/openvpn/easy-rsa/keys/server.crt
#Server使用的证书对应的key,注意文件的权限,防止被盗key /data/openvpn/easy-rsa/keys/server.key # This file should be kept secret
#上面提到的生成的Diffie-Hellman文件dh /data/openvpn/easy-rsa/keys/dh2048.pem
#防止注销用户登录#crl-verify /data/openvpn/easy-rsa/keys/crl.pem#客户端使用的地址、子网掩码server 10.8.0.0 255.255.255.0#用于记录某个Client获得的IP地址,类似于dhcpd.lease文件,#防止openvpn重新启动后“忘记”Client曾经使用过的IP地址ifconfig-pool-persist /data/openvpn/log/ipp.txt
#DHCP的DNS选项push “dhcp-option DNS 114.114.114.114"push “dhcp-option DNS 8.8.4.4"#通过VPN Server往Client push路由,client通过pull指令获得Server push的所有选项并应用push "route 192.168.100.0 255.255.255.0"
#如果可以让VPN Client之间相互访问直接通过openvpn程序转发,#不用发送到tun或者tap设备后重新转发,优化Client to Client的访问效率client-to-client#如果Client使用的CA的Common Name有重复了,或者说客户都使用相同的CA#和keys连接VPN,一定要打开这个选项,否则只允许一个人连接VPN,建议一人一个证书duplicate-cn#定义最大连接数max-clients 10#NAT后面使用VPN,如果VPN长时间不通信,NAT Session可能会失效,#导致VPN连接丢失,为防止之类事情的发生,keepalive提供一个类似于ping的机制,#下面表示每10秒通过VPN的Control通道ping对方,如果连续120秒无法ping通,#认为连接丢失,并重新启动VPN,重新连接#(对于mode server模式下的openvpn不会重新连接)。keepalive 10 120#对数据进行压缩,注意Server和Client一致comp-lzo#通过keepalive检测超时后,重新启动VPN,不重新读取keys,保留第一次使用的keyspersist-key#通过keepalive检测超时后,重新启动VPN,一直保持tun或者tap设备是linkup的,#否则网络连接会先linkdown然后linkuppersist-tun#定期把openvpn的一些状态信息写到文件中,以便自己写程序计费或者进行其它操作status /data/openvpn/log/openvpn-status.log
#和log一致,每次重新启动openvpn后保留原有的log信息,新信息追加到文件最后log-append /data/openvpn/log/openvpn.log
#相当于debug level,具体查看manualverb 3 |
8.启动openvpn服务
|
1
|
/data/openvpn/sbin/openvpn--config /data/openvpn/conf/server.conf &
|
查看是否启动成功
|
1
2
3
4
5
6
|
[root@VPNServer easy-rsa]# netstat -ntlup
Active Internet connections (only servers)Proto Recv-Q Send-Q Local Address Foreign Address State PID/Programname
tcp 0 0 0.0.0.0:22 0.0.0.0:* LISTEN 810/sshd
tcp 0 0 :::22 :::* LISTEN 810/sshd
udp 0 0 0.0.0.0:1194 0.0.0.0:* 16470/openvpn
|
可以看到1194端口已经启动,说明openvpn启动成功
9.注销证书
同事离职了,需要将证书进行注销
|
1
2
3
4
5
6
7
8
9
|
#注销账户test/data/openvpn/easy-rsa/revoke-fulltest
Using configuration from /data/openvpn/easy-rsa/openssl-1.0.0.cnf
Revoking Certificate 03.Data Base UpdatedUsing configuration from /data/openvpn/easy-rsa/openssl-1.0.0.cnf
lushare.crt: C = CN, ST = GD, L = ShenZhen, O = Example INC, OU = Manager, CN = test, name = VPNService, emailAddress = ca@example.com
error 23 at 0 depth lookup:certificate revoked#error 23说明证书已经注销 |
这个时候还是可以利用此证书登录服务器的,在/data/openvpn/conf/server.conf下增加一行
|
1
|
crl-verify /data/openvpn/easy-rsa/keys/crl.pem
|
再重启下openvpn服务即可
|
1
2
|
killall openvpn/data/openvpn/sbin/openvpn--config /data/openvpn/conf/server.conf &
|
这个时候openvpn下的test账户已经不能登录服务器了
10.修改/etc/sysctl.conf
|
1
2
3
4
5
|
vim /etc/sysctl.conf
将下面值修改为1,开启Linux ip跳转net.ipv4.ip_forward = 1#保存后执行sysctl -p |
11.防火墙修改
|
1
2
3
4
5
6
7
8
9
10
11
12
13
14
15
|
iptables -Fiptables -Xiptables -P INPUT DROPiptables -P OUTPUT ACCEPTiptables -P FORWARD ACCEPTiptables -A INPUT -i lo -j ACCEPTiptables -A OUTPUT -o lo -j ACCEPTiptables -A INPUT -m state --state RELATED,ESTABLEISHED -j ACCEPTiptables -A INPUT -p tcp --dport 22 -j ACCEPTiptables -A INPUT -p udp --dport 1194 -j ACCEPT#对IP进行转发iptables -t nat -A POSTROUTING -o eth0 -s 10.8.0.0/24-j MASQUERADE
iptables -t nat -A POSTROUTING -o eth1 -s 10.8.0.0/24-j MASQUERADE
service iptables saveservice iptables restart |
12.客户端安装配置
里面有一个32位的安装客户端,也有一个64位的,按需安装即可
,安装完成后,将C:\Program Files\OpenVPN\sample-config(我这里安装在C:\Program Files\OpenVPN)目录下的client.ovpn
拷贝到C:\Program Files\OpenVPN\config
修改client.ovpn
|
1
2
3
4
5
6
7
8
9
10
11
12
13
14
15
16
17
18
|
clientdev tun #设备类型tun、tap根据服务器来设置
proto udp #所使用的协议有udp、tcp根据服务器来设置
remote 192.168.100.201 1194 #主服务器
#remote 250.250.250.250 1194 #备用服务器#remote-random #开启服务器的轮询,如果设置了多台服务器的话resolv-retry infinitenobind;user nobody;group nobodypersist-keypersist-tunca ca.crt #ca证书是从服务器上下载来的
cert client.crt #生成的客户端证书
key client.key #服务器上生成的密码
ns-cert-typeserver
comp-lzo #压缩类型
verb 3 |


相关推荐
Centos6.5镜像文件 Linux。。
CentOS6.5的64位镜像文件iso。CentOS是基于linux内核而扩展的操作系统。
centos 6.5 telnet 客户端 安装文件 rpm包 centos 6.5 telnet 服务端 安装文件 rpm包 http://vault.centos.org/6.5/os/x86_64/Packages/ 从官网下载亲测可以用
Linux centos 6.5 官网版本Bt下载种子
CentOS 6.5 的 软件源很多官方已经停止维护,该文件包内配置好的yum源是可以正常使用的。将原/etc/yum.repos.d/目录下原来的 .repo 备份, 然后把本文件包内的repo文件复制过去, yum clean all 后,再 yum ...
Centos6.5下安装Oracle 11g.docxCentos6.5下安装Oracle 11g.docx
centos6.5安装LNMP服务器教程
centos6.5 邮件服务器安装视频 自己录制
CentOS6.5 一键安装 Mysql5.6 包含安装包
linux下centos6.5静默安装oracle 12c(图形化安装教程)
Centos 6.5 Oracle 11G R2 安装文档
CentOS 6.5 Samba服务器 权限配置实例。CentOS 6.5 Samba服务器 权限配置实例。
centos 6.5配置mysql5.5
CentOS6.5安装ftp服务, 配置环境并使用
按照需要,将centos6.5离线安装oracle需要的依赖包进行整理,并发布
资源名称:CentOS 6.5 x64下安装19实体节点Hadoop 2.2.0集群配置指南内容简介: CentOS 6.5 x64下安装19实体节点Hadoop 2.2.0集群配置指南主要讲述的是CentOS 6.5 x64下安装19实体节点Hadoop 2.2.0集群配置指南;...
centos6.5 安装专门针对oracle 分区稍有不同,基于图像界面 不过里面也有介绍其他不同的分区
centos6.5rar oracle rpm依赖包centos6.5rar oracle rpm依赖包centos6.5rar oracle rpm依赖包centos6.5rar oracle rpm依赖包
Centos6.5安装keepalive步骤
linux 操作系统CentOS6.5 64位安装OpenStack